Ultrasound-Guided Supraclavicular Brachial Plexus Block

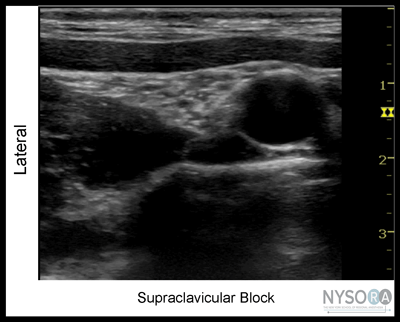
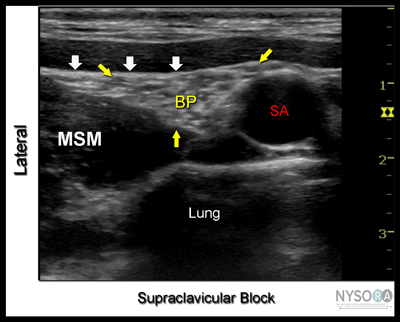
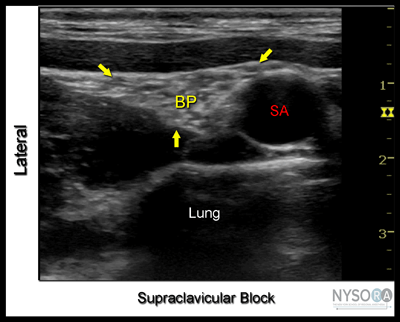
Figure 1: Supraclavicular brachial plexus; transducer position and needle insertion. Essentials  Figure 2: Anatomy of the supraclavicular brachial plexus with transducer placement slightly obliquely above the clavicle (Cl). SA, subclavian artery; arrow, brachial plexus (BP). General Considerations The proximity of the brachial plexus at this location to the chest cavity and pleura, has been of concern to many practitioners (Figure 2). However, ultrasound guidance has resulted in a resurgence of interest in the supraclavicular approach to the brachial plexus. The ability to image the plexus, rib, pleura, and subclavian artery with ultrasound guidance has increased safety due to better monitoring of anatomy and needle placement. Because the trunks and divisions of the brachial plexus are relatively close as they travel over the first rib, the onset and quality of anesthesia is fast and complete. For these reasons, the supraclavicular block has become a popular technique for surgery below the shoulder. Ultrasound Anatomy The subclavian artery crosses over the first rib between the insertions of the anterior and middle scalene muscles, at approximately the midpoint of the clavicle. The pulsating subclavian artery is readily apparent, whereas the parietal pleura and the first rib can be seen as a linear hyperechoic structure immediately lateral and deep to it, respectively (Figure 3). The rib, as an osseous structure, casts an acoustic shadow, so that the image field deep to the rib appears anechoic, or dark. A reverberation artifact often occurs, mimicking a second subclavian artery beneath the rib. The brachial plexus can be seen as a bundle of hypoechoic round nodules (e.g., "grapes") just lateral and superficial to the artery (Figures 3, 4, 5A and B). It is often possible to see the fascial sheath enveloping the brachial plexus. Depending at the level at which the plexus is scanned and the transducer orientation, brachial plexus can have an oval or flattened appearance (Figure 5A and B). Two different sonographic appearances of the brachial plexus (one oval and one flattened) are easily seen by changing the angle of the transducer orientation during imaging. Lateral and medial to the first rib is the hyperechoic pleura, with lung tissue deep to it. This structure can be confirmed by observation of a "sliding" motion of the viscera pleura with the patient's respiration. The brachial plexus is typically visualized at a 1- to 2-cm depth at this location, an important anatomical characteristic of the plexus that must be kept in mind throughout the procedure.
Distribution of Blockade The supraclavicular approach to the brachial plexus blockade results in anesthesia of the upper limb below the shoulder because all trunks and divisions can be anesthetized. The medial skin of the upper arm (intercostobrachial nerve, T2), however, is never anesthetized by any technique of the brachial plexus block and when needed can be blocked by an additional subcutaneous injection just distal to the axilla. For a more comprehensive review of the brachial plexus anatomy and distribution. Equipment Equipment needed includes the following:
Figure 5: (A) Ultrasound image of the brachial plexus (BP) assuming an oval shape and circled by the tissue sheath (yellow arrows). (B) Ultrasound image of the BP at the supraclavicular fossa with the downward orientation of the transducer. The brachial plexus assumes a flatter configuration as it descends underneath the clavicle into the infraclavicular fossa. SA, subclavian artery. ASM, anterior scalene muscle. Landmarks and Patient Positioning 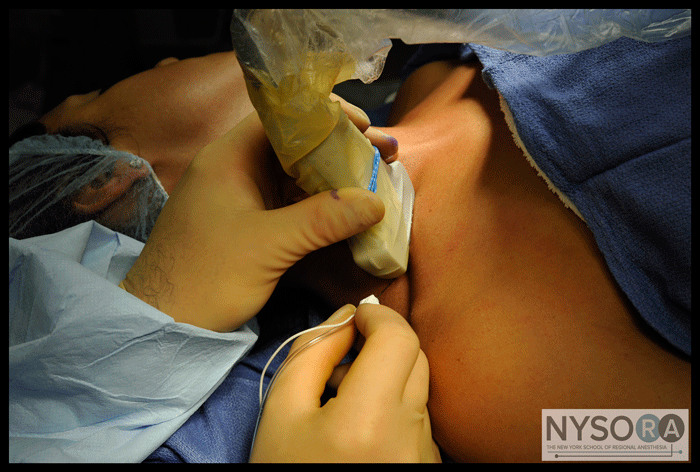 Figure 6: Supraclavicular brachial plexus; transducer position and needle insertion. Any position that allows comfortable placement of the ultrasound transducer and needle advancement is appropriate. This block can be performed with the patient in the supine, semi-sitting (our favorite), or slight oblique position, with the patient's head turned away from the side to be blocked. When possible, asking the patient to reach for the ipsilateral knee will depress the clavicle slightly and allow better access to the structures of the anterolateral neck. Also, a slight elevation of the head of the bed is often more comfortable for the patient and allows for better drainage and less prominence of the neck veins (Figure 1). Adherence to strict anatomic landmarks is of lesser importance for the ultrasound-guided supraclavicular block than for the surface anatomy techniques. However, knowledge of the underlying anatomy and the position of the brachial plexus in relation to the subclavian artery, first rib, and pleura are very important for the success and safety of the technique. Scanning is usually started just above the clavicle at approximately its midpoint.
Technique With the patient in the proper position (we prefer semi-sitting position), the skin is disinfected and the transducer is positioned in the transverse plane immediately superior to the clavicle at approximately its midpoint. The transducer is tilted caudally to obtain a cross-sectional view of the subclavian artery (Figures 6). The brachial plexus is seen as a collection of hypoechoic oval structures lateral and superficial to the artery. 
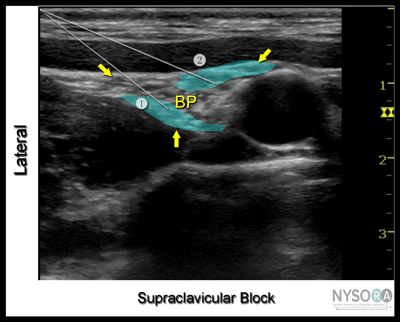
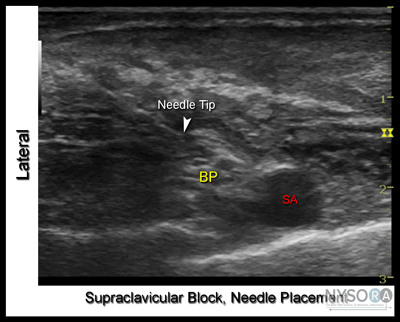
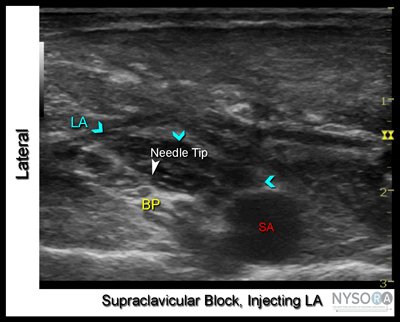
Figure 7: Supraclavicular brachial plexus. Needle path and two separate injections required for block of the supraclavicular brachial plexus. Shown are two needle positions (1 and 2) used to inject local anesthetic within the tissue sheath (arrows) containing the brachial plexus (BP). Using a 25- to 27-gauge needle, 1 to 2 mL of local anesthetic is injected into the skin 1 cm lateral to the transducer to decrease the discomfort during needle insertion. Local infiltration may not be necessary in well premedicated patients. The needle should never be inserted deeper than 1 cm to avoid inadvertent puncture of and injection into the brachial plexus. Always observe the distribution of the local anesthetic during administration by injecting small amounts of the local anesthetic as the needle advances through tissue layers (hydro-localization). The block needle is then inserted in-plane toward the brachial plexus, in a lateral-to-medial direction (Figures 6 and 7). When nerve stimulation is used (0.5 mA, 0.1 msec), the entrance of the needle into the brachial plexus sheath is often associated with a palpable "pop" as the needle passes through the paravertebral fascia/ brachial plexus sheath. In addition, a motor response of the arm, forearm, or hand as another confirmation of the proper needle placement. Note, however, that motor response may be absent despite the adequate needle placement. Tilting the needle slightly within the plexus and/or increasing the current intensity (e.g., 1.0-1.5 mA) will bring about the motor response, if required. After a careful aspiration, 1 to 2 mL of local anesthetic is injected to document the proper needle placement. When the injection displaces the brachial plexus away from the needle, an additional advancement of the needle 1 to 2 mm deeper may be required to accomplish adequate spread of the local anesthetic (Figures 8, 9, and 10). When injection of the local anesthetic does not appear to result in a spread in and around the brachial plexus, additional needle repositioning and injections may be necessary. The required volume of local anesthetic should not be premeditated but rather determined based on the adequacy of the spread. In our practice, 20 to 25 mL is the most common total volume used.
In an adult patient, 20 to 25 mL of local anesthetic is usually adequate for successful and rapid onset of blockade; however, when necessary, higher volumes may be used. Some clinicians recommend injecting a single bolus at the point where the subclavian artery meets the first rib. This is thought to "float" the plexus superficially and result in more reliable blockade of the inferior divisions of the plexus. However, we do not find this useful or safe (risk of pleura puncture); instead it is always beneficial to inject two to three smaller aliquots at different locations within the plexus sheath to assure spread of the local anesthetic solution in all planes containing brachial plexus. In our program, we simply administer two aliquots of local anesthetics at two separate locations within the plexus sheath as seen in Figure 8.
Continuous Ultrasound-Guided Supraclavicular Block The ultrasound-guided continuous supraclavicular block is in many ways similar to the technique for interscalene catheter placement. The goal is to place the catheter in the vicinity of the trunks/divisions of the brachial plexus adjacent to the subclavian artery. The procedure consists of three phases: needle placement, catheter advancement, and securing of the catheter. For the first two phases of the procedure, ultrasound can be used to assure accuracy in most patients. The needle is typically inserted in-plane from the lateral-to-medial direction so that the tip is just lateral to the brachial plexus sheath. The needle is then advanced to indent and transverse the sheath, followed by placement of the catheter.
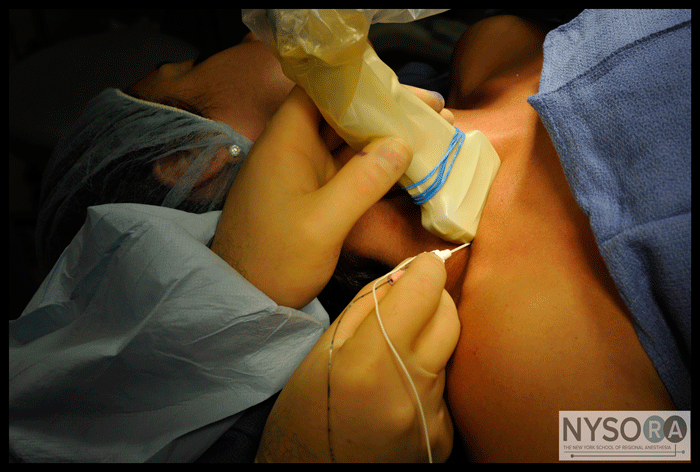 Figure 11: A needle insertion for the continuous supraclavicular brachial plexus block. The catheter is inserted 3-5 cm beyond the needle tip and injected with 3-5 mL of local anesthetic to document the proper dispersion of the local anesthetic within the brachial plexus sheath. Proper placement of the needle can also be confirmed by obtaining a motor response of the arm, forearm, or hand, at which point 4-5 mL of local anesthetic is injected. This small dose of local anesthetic serves to assure adequate distribution of the local anesthetic as well as to make the advancement of the catheter more comfortable to the patient. This first phase of the procedure does not significantly differ from the single-injection technique. The second phase of the procedure involves maintaining the needle in the proper position and inserting the catheter 2 to 3 cm into the sheath of the brachial plexus (Figure 11 shows the preloaded needle with the catheter). Care must be taken not to advance the catheter too far, which may result in the catheter exiting the brachial plexus and the consequent failure to provide analgesia. Insertion of the catheter can be accomplished by either a single operator or a with a helper.
The catheter is secured by either taping to the skin or tunneling. Some clinicians prefer one over the other. The decision about which method to use could be based on the patient's age, duration of the catheter therapy, and anatomy. Tunneling could be preferred in older patients with obesity or mobile skin over the neck and longer planned duration of the catheter infusion. Two main disadvantages of the tunneling are the risk of catheter dislodgment during the tunneling and the potential for scar formation. A number of devices are commercially available to help secure the catheter. The starting infusion regimen is typically 5 mL/hour of 0.2% ropivacaine with 5-mL patient-controlled boluses hourly. 
|
| 02/20/2016(+ 2016 Dates) | |
| 01/27/2016 | |
| 03/17/2016 | |
| 04/20/2016 | |
| 09/23/2016 | |
| 10/01/2024 |
![[advertisement] gehealthcare](../files/banners/banner1_250x600/GEtouch(250X600).gif)

![[advertisement] concertmedical](../files/bk-nysora-ad.jpg)





Post your comment