![[advertisement] concertmedical](../../../files/bk-nysora-ad.jpg)
Lumbar Plexus Block
|
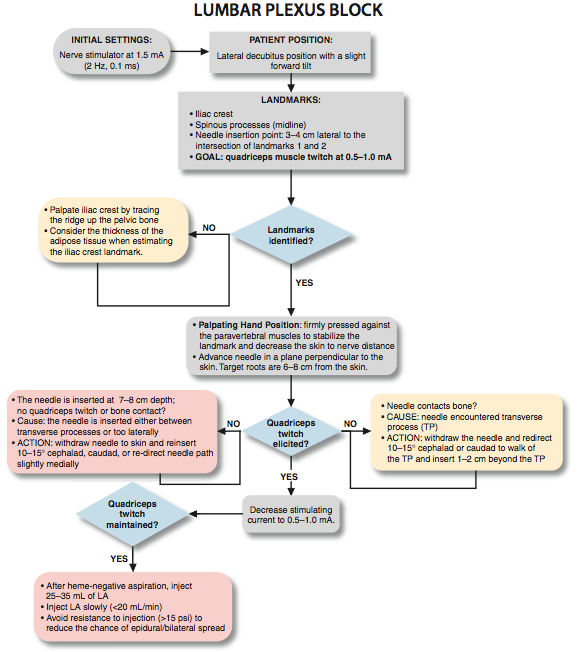
Figure 1: To accomplish the lumbar plexus block, a needle is inserted perpendicular to the skin plane, 4 cm lateral to the midline at the level of L3-L5. Essentials
General Considerations The lumbar plexus block (psoas compartment block) is an advanced nerve block technique. Because the placement of the needle is in the deep muscles, the potential for systemic toxicity is greater than it is with more superficial techniques. The proximity of the lumbar nerve roots to the epidural space also carries a risk of epidural spread of the local anesthetic. For these reasons, care should be taken when selecting the type, volume, and concentration of local anesthetic, particularly in elderly, frail, or obese patients. The lumbar plexus block provides anesthesia or analgesia to the entire distribution of the lumbar plexus, including the anterolateral and medial thigh, the knee, and the saphenous nerve below the knee. When combined with a sciatic nerve block, anesthesia of the entire leg can be achieved. Because of the complexity of the technique, potential for complications, and existence of simpler alternatives (e.g. fascia iliaca or femoral blocks), the benefits of lumbar plexus block should be always be weighed against the risks. Functional Anatomy The lumbar plexus is composed of five to six peripheral nerves that have their origins in the spinal roots of L1 to L4, with a contribution from T12 (Figures 2 and 3). After the roots emerge from the intervertebral foramina, they divide into anterior and posterior branches. The small posterior branches supply innervation to the skin of the lower back and paravertebral muscles. The anterior branches form the lumbar plexus within the substance of the psoas muscle and emerge from the muscle as individual nerves in the pelvis. The major branches of the lumbar plexus are the iliohypogastric (L1), ilioinguinal (L1), genitofemoral nerve (L1/L2), lateral femoral cutaneous nerve (L2/L3), and the femoral and obturator nerves (L2,3,4). Although not a lumbar nerve root, the T12 spinal nerve contributes to the iliohypogastric nerve in about 50% of cases. Distribution of Blockade The femoral nerve supplies the quadriceps muscle (knee extension), the skin of the anteromedial thigh, and the medial aspect of the leg below the knee and foot (Figure 4A and B). The obturator nerve sends motor branches to the adductors of the hip and a variable cutaneous area over the medial thigh or knee joint. The lateral femoral cutaneous, iliohypogastric, ilioinguinal, and genitofemoral nerves are superficial sensory nerves.
Figure 2: Anatomy of the lumbar plexus. Roots of the lumbar plexus (arrows) are seen within the substance of the psoas major muscle (PsMM = 1); the lumbar plexus is exposed through the abdominal cavity.
Figure 3: Organization of the Lumbar Plexus into peripheral nerves. Single Injection Lumbar Plexus Block Equipment A standard regional anesthesia tray is prepared with the following equipment:
Landmarks and Patient Positioning The patient is in the lateral decubitus position with a slight forward tilt (Figure 5). The foot on the side to be blocked should be positioned over the dependent leg so that twitches of the quadriceps muscle and patella can be seen easily. The operator should assume a position from which these responses are visible. Palpation of the anterior thigh can be useful to make sure the motor response is indeed that of the quadriceps muscles.
Figure 4: (A) Cutaneous distribution of the lumbar plexus to the lower extremity. (B) Motor innervation of the lumbar plexus to the lower extremity.
 Figure 5: Patient position for the lumbar plexus block. The anatomical landmarks are as follows (Figure 6): 1. Iliac crests (intercristal line) 2. Spinous processes (midline) 3. A point 3-4 cm lateral to the intersection of landmarks 1 and 2 (needle insertion point) Maneuvers to Facilitate Landmark Identification The identification of the iliac crest can be facilitated by the following maneuvers:
Technique  Figure 6: Landmarks for the lumbar plexus block. The needle insertion site is labeled 3-4 cm lateral to the intersection of the (horizontal) line passing through spinous processes and iliac crest (perpendicular) line. After disinfecting with an antiseptic solution, the skin and paravertebral muscles are anesthetized by infiltrating local anesthetic subcutaneously at site of needle insertion. The fingers of the palpating hand are firmly pressed against the paravertebral muscles to stabilize the landmark and decrease the skin-nerve distance (Figure 8). The palpating hand should not be moved during the entire block procedure so that precise redirections of the angle of needle insertion can be made, if necessary. The needle is inserted at an angle perpendicular to the skin with the nerve stimulator set initially to deliver a current of 1.5 mA (1.5 mA, 2 Hz, 0.1-0.3 ms). As the needle is advanced, local twitches of the paravertebral muscles are obtained first at a depth of a few centimeters. The needle is advanced further, until twitches of the quadriceps muscle are obtained (usually at a depth of 6-8 cm). After these twitches are observed, the current should be lowered to produce stimulation between 0.5 and 1.0 mA. Motor response should not be present at a current less than 0.5 mA, which could indicate needle placement in the dural sleeve. At this point, 25 to 35 mL of local anesthetic is injected slowly while avoiding resistance to injection and with frequent aspirations to rule out inadvertent intravascular needle placement. A resultant, typical spread of the local anesthetic solution is demonstrated in Figure 9.
Table 1: Some Common Responses to Nerve Stimulation and Course of Action for Proper Response 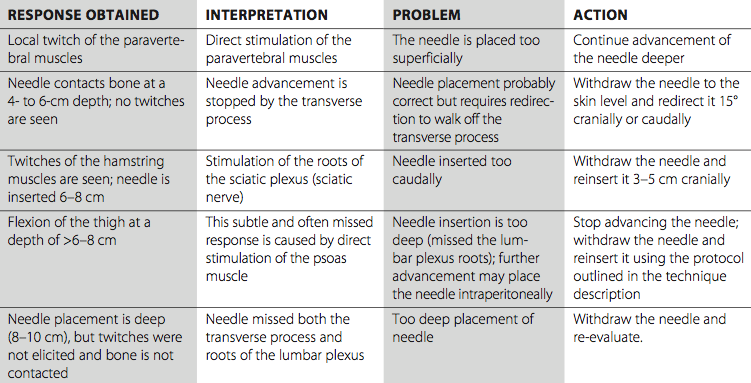
Troubleshooting When insertion of the needle does not result in quadriceps muscle stimulation, the following maneuvers should be followed: 1. Withdraw the needle to the skin level, redirect it 5° to 10° cranially, and repeat the procedure. 2. Withdraw the needle to the skin level, redirect it 5° to 10° caudally, and repeat the procedure. 3. Withdraw the needle to the skin level, redirect it 5° to 10° medially, and repeat the procedure. 4. Withdraw the needle to the skin level, reinsert it 2 cm caudally or cranially, and repeat the procedure.
Block Dynamics and Perioperative Management A lumbar plexus block can be associated with significant patient discomfort because the needle passes through multiple muscle planes. Adequate sedation and analgesia are necessary to ensure a still and cooperative patient. We often use midazolam 4 to 6 mg after the patient is positioned and alfentanil 500 to 750 µg just before needle insertion. A typical onset time for this block is 20 to 30 minutes, depending on the type, concentration, and volume of local anesthetic and the level at which the needle is placed. The first sign of the onset of blockade is usually a loss of sensation in the saphenous nerve territory (medial skin below the knee). Continuous Lumbar Plexus Block  Figure 9: Radiograph demonstrating distribution of the radiopaque solution within the psoas muscle after a lumbar plexus injection. A continuous lumbar plexus blockade is an advanced regional anesthesia technique, and adequate experience with the single-injection technique is a prerequisite to ensure its efficacy and safety. Otherwise, the technique is quite similar to the single-injection procedure, except that a Tuohy-style needle is preferred. The needle opening should be directed caudad and laterally to facilitate threading of the catheter in the direction of the plexus. The technique can be used for postoperative pain management in patients undergoing hip, femur, and knee surgery. Equipment A standard regional anesthesia tray is prepared with the fol- lowing equipment:
Landmarks and Patient Positioning As for the single-injection technique, the patient is positioned in the lateral decubitus position with the side to be blocked up and with a slightly forward pelvic tilt (Figure 4). An assistant helps maintain flexion of the spine, as in positioning a patient for an epidural or spinal block in the lateral position. The landmarks for a continuous lumbar plexus block are the same as for the single-injection technique (Figure 6): 1. Iliac crests (intercristal line) 2. Midline (spinous processes) 3. Needle insertion site 4 cm lateral to the intersection of landmarks 1 and 2 Technique  Figure 10: Insertion of the catheter in the lumbar plexus. The catheter is inserted approximately 5 cm beyond the needle tip. The skin and subcutaneous tissues are anesthetized with local anesthetic. The needle is attached to the nerve stimulator (1.5 mA, 2 Hz). The palpating hand should be firmly pressed and anchored against the paraspinal muscles to facilitate needle insertion and redirection of the needle when necessary. An 8-10-cm Tuohy-style continuous block needle is inserted at a perpendicular angle and advanced until the quadriceps muscle contractions are obtained at 0.5 to 1.0 mA. A 5-10 mL of local anesthetic or other injectate (e.g., D5W) is injected to "open up" a tissue space and facilitate catheter advancement. The catheter is threaded through the needle for approximately 5 cm beyond the tip of the needle (Figure 10). The needle is withdrawn, the catheter secured, and the remaining anesthetic is injected via the catheter. Before administration of the local anesthetic, the needle and/or catheter are checked for inadvertent intravascular and intrathecal placement. This is done by performing an aspiration test and administering a test dose of epinephrine-containing local anesthetic. Continuous Infusion Continuous infusion is always initiated after an initial bolus of dilute local anesthetic through the needle or catheter. For this purpose, 0.2% ropivacaine (15 to 20 mL) is used most commonly. The infusion is maintained at 5 mL/h with 5 mL/h patient-controlled regional analgesia bolus dose.
Complications and How to Avoid Them The lumbar plexus block is an advanced nerve block technique that carries a potential for serious complications if proper precautions are not strictly followed. Some complications and methods to decrease the risk of them are listed in Table 2. Table 2: Complications of Lumbar Plexus Block and How to Avoid Them 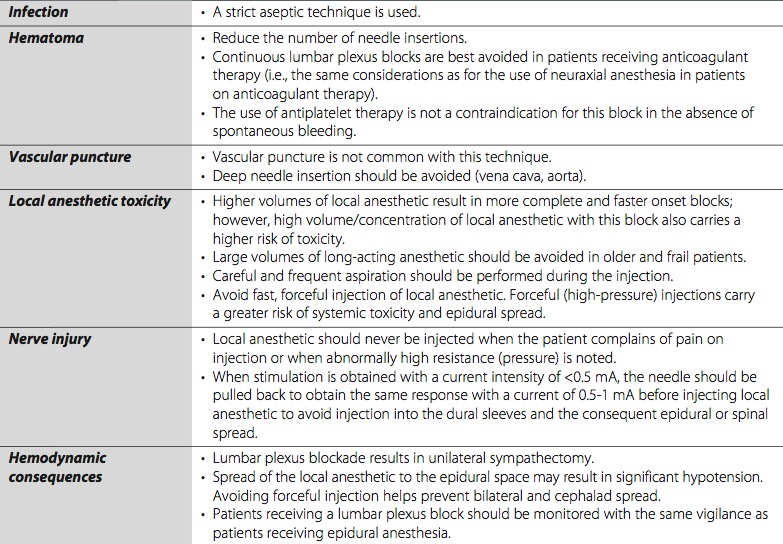
|


 Facebook
 del.icio.us
 Digg
Digg
 StumbleUpon
More from Ultrasound-Guided
Spinal and Epidural Block
Authors: Wing Hong Kwok and Manoj Karmakar Introduction Ultrasound scanning (US) can offer several advantages when used ...
Thoracic Paravertebral Block
Authors: Catherine Vandepitte, Tatjana Stopar Pintaric, and Philippe E. Gautier Thoracic paravertebral block (PVB) is a ...
| 12/19/2015(+ 2016 Dates) | |
| 01/27/2016 | |
| 03/17/2016 | |
| 04/20/2016 | |
| 09/24/2016 | |
| 10/01/2024 |
![[advertisement] gehealthcare](../../../files/banners/banner1_250x600/GEtouch(250X600).gif)
Image gallery


Post your comment